It’s that time of year. Holiday cards have begun to arrive in the mail and I especially enjoy the cards that are photo cards. I love collecting all of the wonderful pictures of all of our loved ones. I love admiring the creativity of friends who decided to take special pictures just for their cards, or new babies who have joined the world this year, or even that really great shot of a couple who was married in the past year. Typically, and this may seem harsh, but I don’t keep cards, unless they are from my husband. For example, at Christmas, I’ll display the cards we receive for a few weeks and then into the recycling they go. Here’s where I get a little OCD but I don’t like collecting things. Stacks of paper and cards are one of those things that just eats at me. WITH THE EXCEPTION OF PHOTO CARDS! Those I most certainly keep. In fact, I’ve been collecting those for several years now and finally decided I should get my booty in gear and arrange them in some sort of album as I’ve intended.
On that note, I have never sent a photo card myself. Mostly because I just never felt we had any pictures that were worthwhile enough to share. Last year, I’d hoped to have my wedding photos back in time but that didn’t happen so I went the traditional route instead. No biggie…but it would have seemed silly to use those this season given that the wedding was over a year ago. Either way, as you know, Andrew and I have been on quite a few excursions this past year and have gotten some pretty great shots of the both of us if I do say so myself. Recently, I was culling through some photos and it dawned on me that one or two of these wouldn’t be too shabby to share as a holiday card. Maybe it’s self-centered but I thought family and friends might like a nice photo of us. As I mentioned, I know how much I appreciate receiving this type of card from others so why not join the fun?!
I could have gone the quick and pricey route and used a website such as Tiny Prints, or even CVS or Walgreens. They have some fantastic pre-designed cards but given that I needed 50 of them, it would have set me back about $70 (a quick glance reveals that the average pre-designed card is approximately $1.30 each.) If I had taken professional photos for the purpose of the card then I have to admit I might have gone this route however, I had a personal photo I was using and with a few little tricks up my sleeve, I was sure I could fashion my own card without breaking the bank.
Cue PicMonkey. In case you aren’t familiar, PicMonkey is a free online photo editing program and if you were curious about how I add text and graphics to some of my pictures around the blog, this is it. I have a pretty great photo editing tool call Pixelmator on my Mac but PicMonkey is user-friendly and fast. Don’t even ask if I have Photoshop. I don’t, but I hope to dabble in that someday once I get more comfortable manipulating images in these two programs.
With the tools available in PicMonkey, and the ability to print through a website such as Shutterfly, I was sure I could construct my own cards in a breeze.
Below, I’ve provided a tutorial on how I constructed our holiday card this year using Picmonkey.
My inspiration was chevron, monograms, and soft holiday colors.
Here’s how I made my own :
Go to the PicMonkey website. Click on Create a Collage.
 On the left hand side of the screen, click layouts (the “boxes” icon), then click cards in the tool bar. From the drop down menu, choose 4×8, and the 2 boxes layout.
 Click open from the toolbar on the top to choose the photo you would like to use from your computer and upload. Then, simply drag and drop the picture into the left or right box. I chose to add my photo to the right hand side.
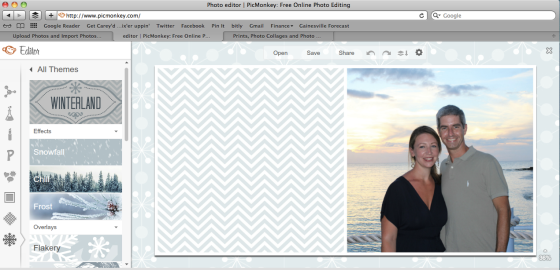
Looking back to the tool bar on the left, choose textures (looks like a grid). PicMonkey has several great holiday textures or backgrounds. When I saw the chevron pattern I was sold. Drag and drop your desired texture into the remaining box. At this point you will want to save this image to your computer in order to proceed to the next step.
Return to the PicMonkey homepage and click Edit a Photo. This will begin the step where you can add text and some more graphics, etc.
(By the way, you can use the Edit a Photo feature in PicMonkey to make any changes you may desire to your actual photo…such as adjusting exposure, tones, special color effects, etc.

Those will be the first two icons on the left hand side (they look like chemistry symbols) for Basic Edits and Effects).
I then clicked on the snowflake icon to open themes. From there, I clicked winterize to open the holiday photo editing tools.

There are so many fun graphics and themes to play with and they change seasonally. After some experimentation, I chose graphics from the wreathery and holly option to make a template for my monogram.
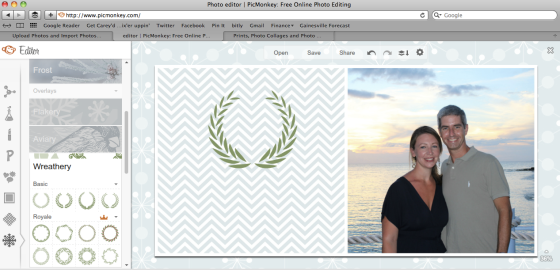

After opening these icons, simply drag around the screen to position. Then, click on “P” in the tool bar on the left to open the add text feature. You can choose from a wide variety of fonts. Again, you can drag the text box on the screen to position your message and also edit the text using the editing box. It allows you to change the color, size, contrast, etc.

First, I chose the font I wanted for my monogram and typed a capital letter C. I adjusted the size of the font to fit within the wreath and positioned. Using the color editing tools, I clicked on the bar to the right of the color box to open the eye dropper. I then used this tool to pick up the color of the green in the wreath so my text would match. I then set the color. I used another font and a new text box to type my greeting and completed the same procedure with the eye dropper to match my text to the color of the wreath.
Finally, I checked my spelling, made sure everything was the way I wanted, and saved the image to my desktop.
The final product:

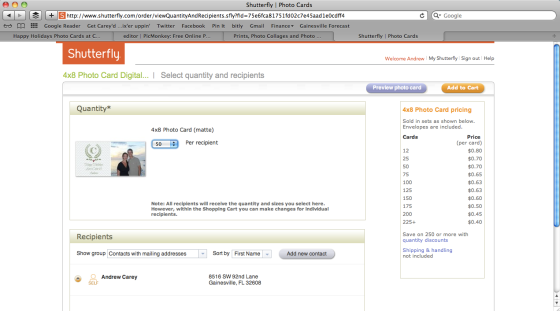
I then proceeded to visit Shutterfly to locate a blank 4×8 card. I simply used the search bar at the top of the home page and typed in blank 4×8. It popped right up. Following the onscreen prompts, I was able to upload my photo, preview my card, and order the amount that I needed complete with envelopes for mailing.
The best part, I used a coupon and received free shipping! While I haven’t done a formal calculation, I estimate that I saved at least 25% by making my own cards as opposed to ordering a pre-designed card.
Overall, I’m really pleased with how these turned out and I look forward to getting them in the mail!
By the way, I was in no was compensated or otherwise incentivized for using, featuring, or singing the praises of PicMonkey or Shutterfly. These are resources that I’ve used in the past and they have worked well for me so naturally, I returned to these to construct my cards. My opinions and experiences are entirely my own. You should also know that when I completed my Shutterfly order, there was an automated opportunity (they did not seek me out specifically) to feature my project in this post. I will be emailing a link to my post regarding this project to Shutterfly for the opportunity to receive a $10 gift card. Anyway, I like to keep things on the up and up with ya’ll so there ya go.

If you’ve made a great card or other photo gift using PicMonkey I’d love to hear about it or see your results!
